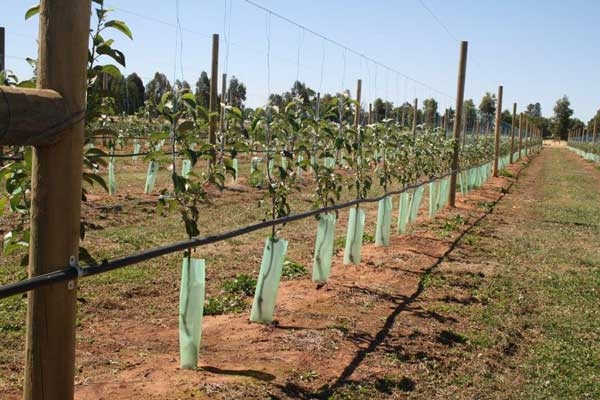
Establishing a high-density orchard is costly. You must do it right the first time.
Once an orchard is established, it is difficult and costly to make corrections.
For high yields of good quality fruit, trees need lots of feeder roots in the surface soil to take up water and nutrients.
To enable this, the surface soil should be deep, soft, stable, well-structured, well-drained, fertile, have a pHwater of between 5.8 and 6.5, and be cool in summer.
So you often need to improve the fertility and structure of the surface soil, that is, the infiltration and storage of water in the soil and; surface and deep drainage of the soil. You also need to increase the depth of surface soil if it is shallow in your orchard.
You can prepare the soil using these six steps.
STEP 1. Have your soils tested
Whether it is new land or old orchard land, you need to get the surface soil tested to see if you need to add lime, gypsum, and/or phosphorus, and to which depths.
Take soil samples of the surface soil from at least ten sites per block in the orchard. Mix the soil thoroughly, take a sub-sample of about 3 kg and send this sample to a laboratory.
As you sample the soil, you will also see how deep the surface soil is, and whether there are any hard layers which restrict water, air and roots from deeper layers.
Lime would be needed if the pH(water) of the soil is 5.7 or less, i.e. is acid.
Gypsum would be needed if the soil is hard due to dispersion.
Phosphorus would be needed unless superphosphate had previously been applied each year to the soil and a soil test shows that there is an adequate amount of soluble phosphorus available to the young trees.
STEP 2. Grade your block (if necessary)
Before you apply the lime, gypsum and/or phosphorus (if your soil test indicates these are needed), you must laser-grade the block to make sure it has a slight slope (e.g. 1 in 80), so excess water drains from the surface of the soil.
This will help to avoid waterlogging of the surface soil.
STEP 3. Apply lime, gypsum and phosphorus (if necessary), and rip and cultivate the soil
Some surface soils are naturally hard and dense, and others have a plow sole or shallow hard pan due to excessive cultivation and traffic. All these hard layers need to be broken up.
After you have spread lime, gypsum and/or phosphorus (if your soil test indicated these were needed), rip the soil both ways to a depth of about 300 to 400 mm. This is usually done in early autumn, about 24 to 48 hours after heavy rain—when the soil has drained.
Be careful not to mix heavy subsoil with the surface soil.
After you have ripped the soil, slightly cultivate the moist but well-drained surface soil to form small clods. Do not pulverize the soil, which would happen if the soil is cultivated when too dry.
This is also the time to put in the mains and sub-mains of a new irrigation system.
Lime and phosphorus are not very soluble and move very slowly in soil, so you need to cultivate them into the surface soil.
Apply agricultural limestone (calcium carbonate) over the whole block, but apply superphosphate along the future planting lines about 1 to 2 metres wide and rototill it in.
Phosphorus is important for root growth, and young trees will benefit from phosphorus if it is nearby, i.e. if mixed into the surface oil.
Gypsum is moderately soluble, so, if applied to the surface of the soil, may eventually be washed down the profile to the subsoil.
Why do some soils need lime? (continues next month)
See this article in Tree Fruit January 2015